
Archive for the 'Farm Life' Category
Oct
23
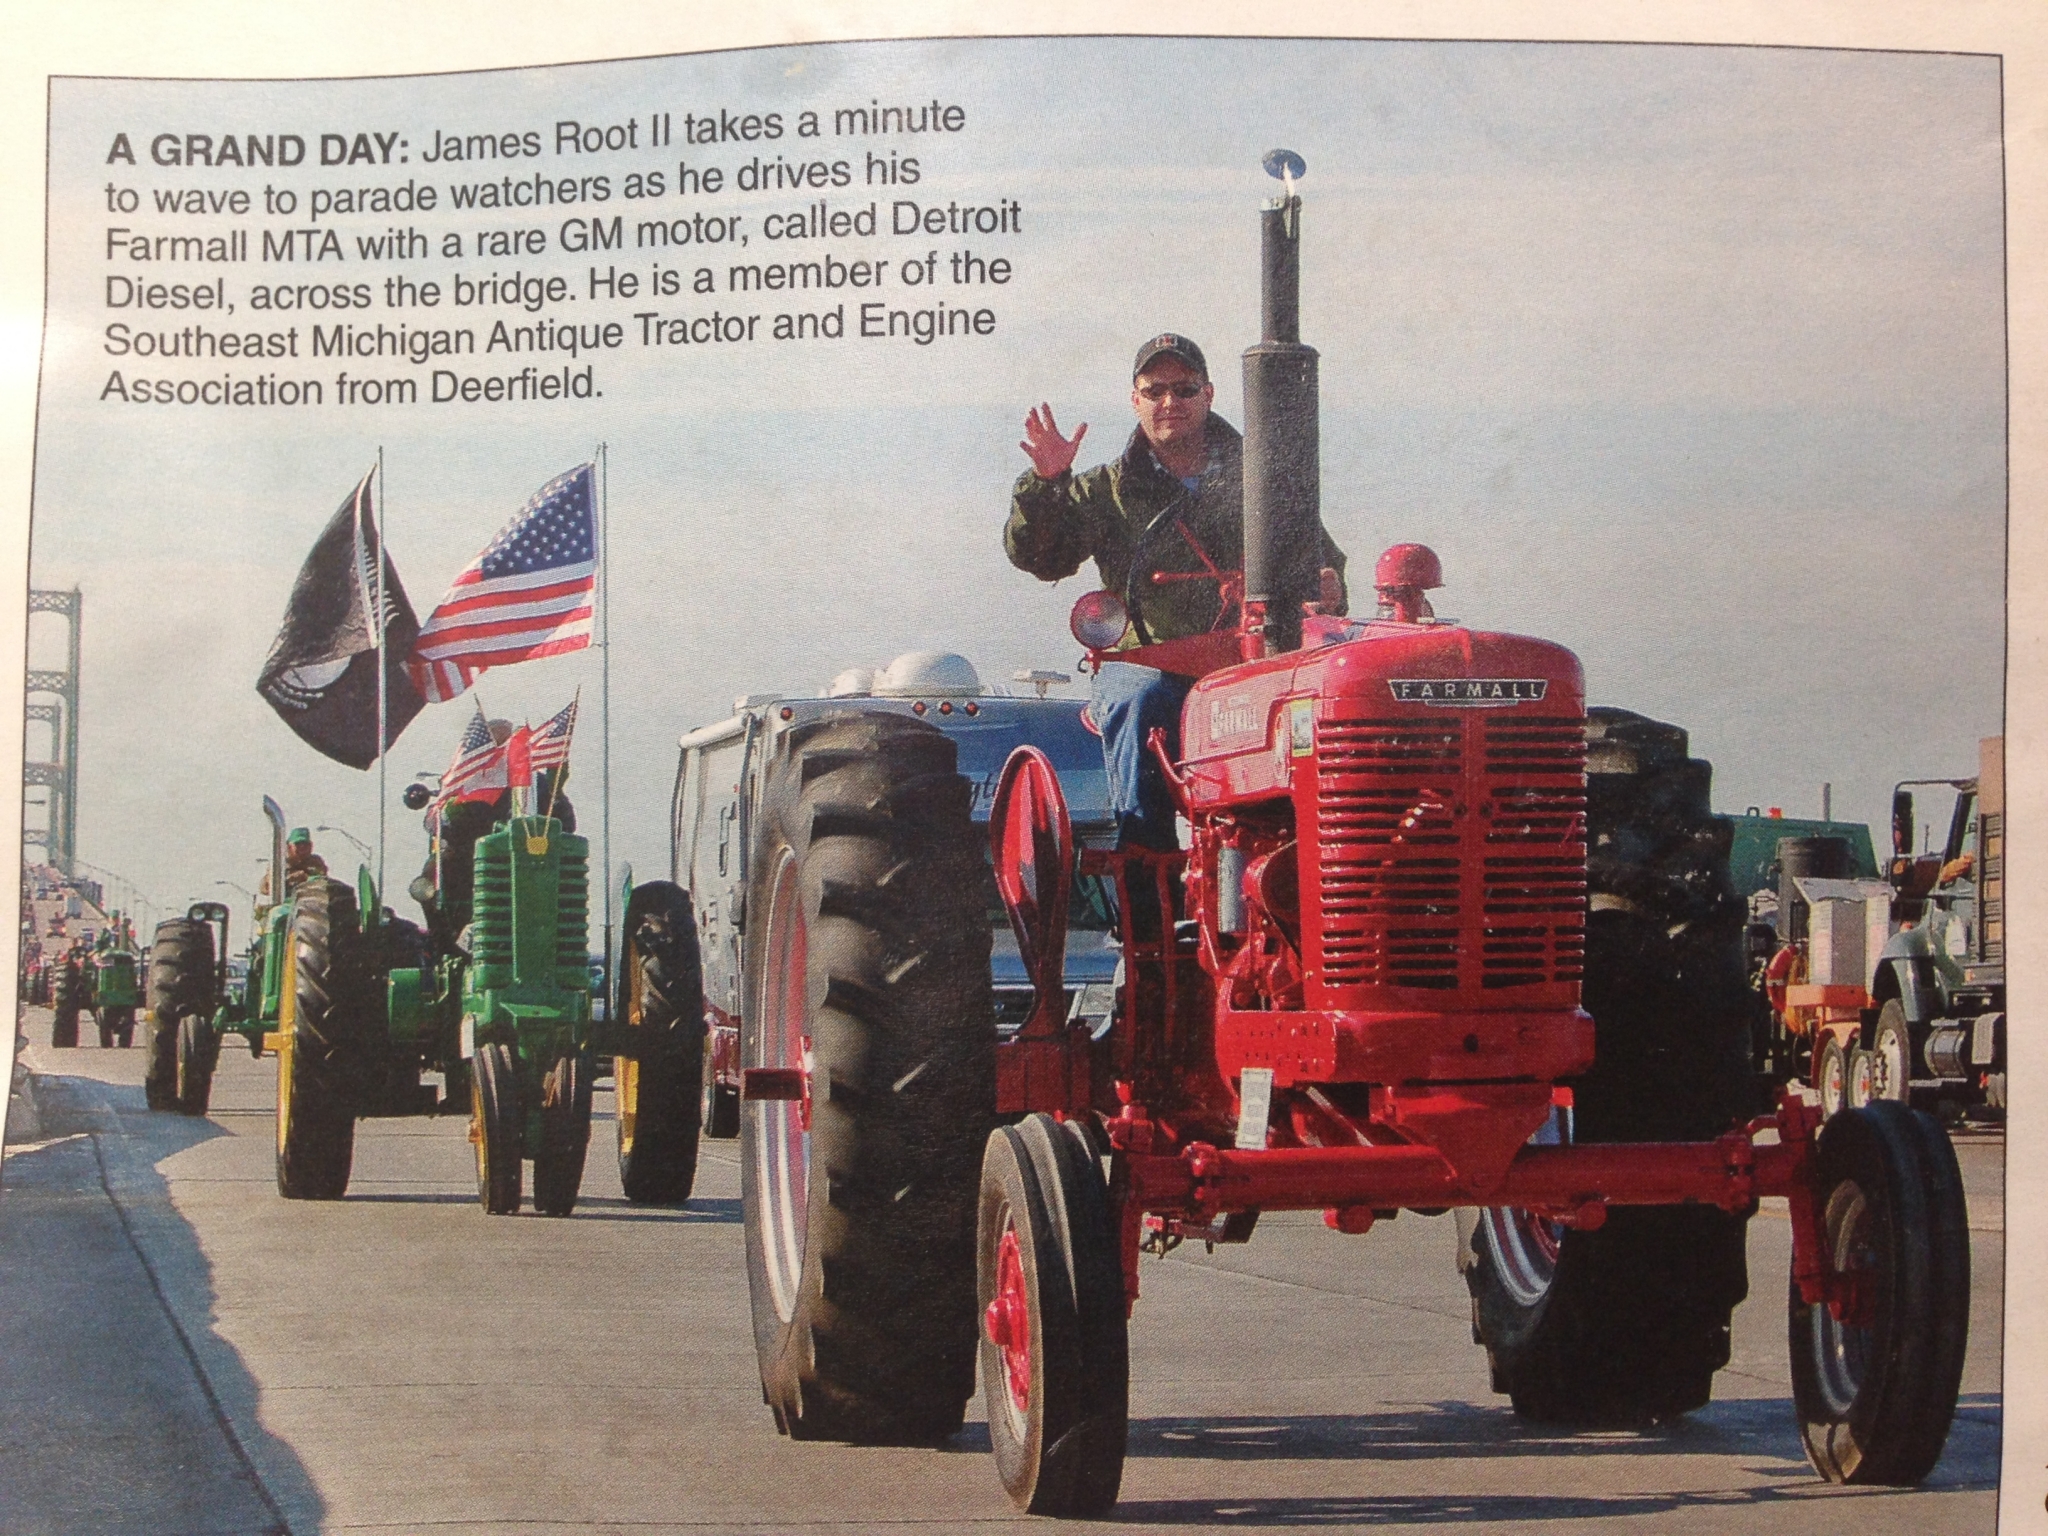
Late last month (September) I received a telephone call from Bob Baumgras of Owosso Tractor Parts. Bob is also the organizer of the Mackinac Bridge Tractor Ride event. Bob wanted to verify that the tractor and person in the photograph he was looking at was me. He described the what he had and sure enough it was. To my surprise he told me that this photograph was going to be the cover photo of the October issue of Michigan Farmer magazine.
The photograph was taken as we were coming off of the bridge approaching the toll booths on the North side of the Straits of Mackinac. I had seen the young lady taking photographs and leaned ever so slightly to my right and gave a big wave as I drove by. Good thing the M is so photogenic! Though, sadly it is only an M and not an MTA…
Ironically I was looking at all of the photographs that form an array of memories atop the baby grand piano separating the living and dining room at home. To my surprise there is a photograph of my father on the M taken in nearly the same spot when he participated in the parade in 2009. I can only imagine the smile and gloating that is going on above the clouds.
Sep
12
The 6th annual Mackinac Bridge tractor crossing (and show) was earlier this month. A great event and a rare opportunity, I highly recommend participating. The GM powered M made the event for the third time and we thoroughly enjoyed it. The following is a series of video taken before, during and after the bridge crossing. You can find photographs of the event at:
http://www.jarootfarms.com/gallery
Enjoy!
This post is a little late in coming. I had a deadline to finish this project of September 12, 2012. I finished and loaded it on the trailer about 1 am September 13, 2012 and promptly headed for the Mackinac Bridge to participate in the 6th annual Mackinac Bridge Tractor Ride put on by Owosso Tractor Parts.

I had zero miles on the M and about 30 minutes of run time on the engine. Needless to say, though confident in my mechanical abilities, there was some nervousness for the first few miles of the ride. By the time I reached Mackinaw City from the staging area West of town the butterflies were gone. In the end the M and the little Detroit performed flawlessly without issues other than I hooked the ammeter up backward.
 & John (R) Root - 2009 Owosso Tractor Parts Mackinac Bridge Tractor Ride.") I have spoken of the background in other related posts about how my Father acquired this tractor, finally, in 2007. My Father passed in early 2010 after driving this tractor in the bridge ride event in 2009, his last tractor show / parade. After my uncle passed in early 2011 it was up to me, more or less, to dispose of the physical contents of the partnership and farm. I held an auction in June 2012, less than a week after losing my Mother to Leukemia. This was the only tractor I kept of the 14 that my Father, Uncle and I had, because of the sentimental value it possesses and because it was my father’s “Holy Grail”.
I have spoken of the background in other related posts about how my Father acquired this tractor, finally, in 2007. My Father passed in early 2010 after driving this tractor in the bridge ride event in 2009, his last tractor show / parade. After my uncle passed in early 2011 it was up to me, more or less, to dispose of the physical contents of the partnership and farm. I held an auction in June 2012, less than a week after losing my Mother to Leukemia. This was the only tractor I kept of the 14 that my Father, Uncle and I had, because of the sentimental value it possesses and because it was my father’s “Holy Grail”.
 I brought her to my place in January of 2012 and it would not run. It had a stuck an injector while sitting in the barn at my parent’s between my Father’s passing and me bringing it home. I had started it at Christmas time, 2011, when I was home and it ran away on me. There is no air shut-off above the blower and the only alternative I was left with was to kill the fuel and let it run itself out. This took the rings out of it, what was left of them anyway. It has not started well since we had owned it. After that all she would do was make a little smoke out the stack, even with ether.
 Once I had it home I spent some time straightening a few things out with the engine and I put new N series 18.7:1 1.050 port high deck liners and pistons in it. Just FYI, this won’t work. The 18.7:1 pistons sit proud of the deck in a low block and you cannot get a head gasket to seal. The compression height doesn’t change and the low block, which uses a full head gasket is 1/16th inch lower in deck height. You must use low deck 17.5:1 .81 port pistons and liners. I finally came to the conclusion that I was going to have to purchase and install the correct Federal Mogul kit for the 2-71 and after that I was caught up in my Mother’s illness and prep for the farm auction and sale. If that wasn’t enough I found myself unemployed May 29th, 2012… An actual blessing in disguise.
 From Mid June onward I was full time working out of my shop on projects and on this tractor with the September deadline looming. Everything I touched needed to be repaired or replaced it seems. I started at the front end and worked my way back. I had to replace every steering seal, bearing and bushing in the bolster as well as the tie rod ends. Then I had to rebuild the Char-Lynn power steering motor. I broke down and bought the correct rebuild kit from Federal Mogul (through Endurance Power) and went through the cylinder head, replaced the one bad injector (70 CM old body N style) and buttoned her up. Then I went to replace the left outer axle seal and things got ugly fast.
 The bearing behind the seal was missing half of the balls. I popped the top to find them and what I found made me ill… Bits and pieces of bearing everywhere, rust galore, rough, pitted, rusty ball bearings, all of the rollers from the pinion bearing lying in the sump, all oil passages and returns packed full of steel shavings. I replaced every bearing, seal and gasket. I completely emptied the rear end housing and started from scratch reassembling and setting it up.

Every component was disassembled, cleaned, inspected and replaced. This is a testament to how durable these tractors were. I am truly amazed that this M was able to make the 20 mile road trip in road gear in 2009 and not have some form of catastrophic rear-end or transmission failure. My father was truly lucky to have completed the ride IMO. Aside from being noisy, as most 65 year old Farmalls are in the rear end there really were no “signs” of impending doom. I had never planned to open up the rear end either. God was at work for sure. After a lot of time, blood, sweat, tears, a few swear words and A LOT of dollar bills I finally had it buttoned up Mid August.

I took me another week to mock up all of the wiring and plumbing for the electrical, fuel and hydraulic systems, including making all hard fuel lines, hoses, cables and wiring. I also had to re-fabricate the air intake system, fabricate a fan shroud, modify a “new” hood and re-solder just about every joint on the radiator (after unplugging it, inside and out). I wanted to put the tractor together as it would be, mechanically, before refinishing it. The last thing I wanted to have happen was to find out something didn’t fit after painting. Now I was beginning to feel the pressure and wondered if I should just forego paint and head North.
I ended up painting it, obviously. PPG’s Shop Line product family. I don’t recommend it for topcoat in Acrylic Urethane. The coverage is poor, especially on corners and rough surfaces. I put 2 gallons of paint and one gallon of epoxy primer, gain Shop Line, on the old girl who was, by this time, almost a “new” tractor mechanically.
Since this tractor had only been repainted one time in it’s life I used stripper and the power washer to take it to bare metal, most of the way anyhow. I have found, through past experience that sandblasting a chassis put sand in everything and after the time I had spent replacing seals and gaskets I didn’t feel like pushing sand into them.
 In the process of stripping I found some old decals applied over the original paint. I documented them digitally as well as dimensionally so I can have them recreated in the future. On each side of the grill there were GM Diesel Power decals and on the left side of the tank there was a decal that read, in 3 lines,
Sold and Services By
The Earle Equipment Co.
Detroit – Grand Rapids
 Doing some research I have discovered that the Earle Equipment Co. was a Detroit based construction and agricultural equipment supplier and repairer that was a GM Diesel distributor as well as an Allis Chalmers dealer. They advertised retrofitting your equipment with GM Diesel Power. I have a few pieces of literature from them with these advertisements. The company went under in the early 1980’s but had existed since the 20’s. My assumption, as there is no clear provenance, is that the Earle Equipment Co did the original installation of this GM Diesel package in this tractor. My goal is to try and trace this tractor’s history of ownership as I can in the near future. I am not very confident that I will be able to prove that the Earle Equipment Co. actually installed this engine because of the companies bankruptcy nearly 30 years ago and the fact that this install would have occurred just shy of 65 years ago. Records are likely long gone.
 While stripping I also found the tag for the engine which riveted to the block behind the left frame rail. The block S/N is also stamped just below the deck behind the governor. This tractor is a 1949 with a SN of 210XXX. The engine SN is 18830 which puts it at a 1949 or 1950. This also leads me to believe that this engine was installed not long after this tractor was purchased by the owner.
 After stripping what I could I went over the chassis with the wire wheel on an angle grinder to remove the remaining paint, rust, scale, grease and dirt. All small parts and parts that could be removed from the chassis were blasted in the cabinet with black beauty. Some parts were re-assembled prior to priming but most were primed and painted off the chassis and then assembled. A good wash with mineral spirits and grease – wax remover and I laid down the primer. The PPG Shop Line Epoxy Prime actually lays down and covers well. I have no complaints with it. It is significantly less expensive than PPG DPLF but due to the mixing ratio 2:1 vs 1:1 it doesn’t go as far.

 As I mentioned before the Shop Line Acrylic Urethane doesn’t cover well on rough or textured surfaces such as castings. On flat sheet metal it is fine and covers well in 2 coats. If you are going to use it I would recommend a prime that is close in color. The Primer I used was gray, resulting generally in a “lighter” shade of topcoat finish. I would consider a red primer if I was to use the Shop Line Urethane again. My PPG distributor has since told me a much better option would be their industrial (fleet) finish line. Durable, better coverage, good application, available in urethane and about the same price as the Shop Line Urethane. I will likely go this route on my next restoration, likely the Super A. The whole priming and painting took me about a week and a half.

 Assembly was pretty straight forward. Since I had mocked the whole tractor up prior to finish it was a matter, more or less, of just re-assembly. The wiring took some time as I was using an OEM Tractor Parts Super M wiring harness that I had on hand. I had also modified the starting system to be more robust since the GM was drawing a lot of amperage through the stock Delco starter. This was resulting in burnt up starter switches, the one located behind the base of the steering post. I changed things up by using that foot switch to actuate a 4 post solenoid mounted to the starter. I was able to use the coil and ignition switch wires to tie this all in. The rear tail light wire was too long and the length I cut off allowed me to wire the foot switch to the electrical box. 2/0 battery cables with soldered ends and a 950CCA battery in the stock under tank battery box get her spinning and started. The engine still requires a little snort of either when it is cold unless you want to go through the crank and wait cycle for 5 minutes.


 In the end, I made it Mackinac without much fanfare, stress or excitement. The day of the ride, the further I drove her the better she ran. No noises, smoke, leaks, rattles, etc. She made the 20 mile ride from Mackinaw City to St. Ignace without a hiccup. She really drew the attention over the weekend. This is a unique tractor that you rarely see, especially a period installation rather than a modern fabrication. I am proud to have it in my stable and to be able to be a steward for it. I can hope my Father would be proud of how she turned out and it is somber to know he never was able to enjoy it. This has been a bittersweet journey for me. I have tried to incorporate elements from my Father, Uncle, Grandfather and our family farm, which was sold in July. I maintained most of what my father and uncle had done to configure the M. These modifications include a factory WFE, 560 rims and centers, Char-Lynn power steering, Vickers crankshaft driven hydraulic pump, fan and extension, M&W throttle lever and numerous odds and ends. The hood I utilized, as the existing was cut up beyond repair, is from the M my grandfather bought new in 1945.
I hope to display the M for the rest of the antique tractor community to enjoy in the coming years, including the 2013 Red Power Round-up in Lima Ohio. I am always eager to discuss this tractor or any others like it with anyone interested in doing so. Please feel free to contact me if you have questions, information or just wish to chew the fat.
Regards,
James A. Root II

Aug
1
2012 began well enough except for my mother’s illness. In October 2011 my Mother was diagnosed with MDS (Myelodysplastic Syndrome). In January she underwent her first bone marrow transplant. By the time she checked into the hospital her abnormal cell count was high enough to classify her illness as AML (Acute Myeloid Leukemia). This began a long journey for myself and my family. Two bone marrow transplants and a round of remission chemotherapy later my Mother passed June 10, 2012 from complications due to MRSA resulting in septic shock and a four week ordeal in the Medical ICU.
Needless to say, May and June were months that had me preoccupied and while I managed to plant everything I failed to be able to dedicate the time to tend to it. In the midst of my Mother’s battle with cancer I suddenly found myself unemployed and I was also busy organizing for the auction. Just shy of 300 hours of labor went into organizing the auction and it went off without much fanfare on June 16, 2012. We buried my Mother 2 days later on June 18th. The worst week of my life.
Drought conditions across the Midwest and particularly Southern Michigan have been hard on agriculture unless you have a way to put some water down. Commodity crops as well as produce are feeling Mother Nature’s wrath. We are lucky enough to have neighbors that irrigate their silage corn and in turn our sweet corn receives adequate water. Raccoons are a separate issue altogether. As of writing this we have taken 57 raccoons out of the sweet corn and they still managed to destroy the majority of the first acre of corn. Plastic and drip tape have been a Godsend for everything else and the tomatoes, peppers and melons are thriving and we have begun harvesting some. I spent a couple of weeks moving the sprinklers around to get water on some pumpkins, gourds and popcorn though. June 2012 we received less than .25 inches of rain and July only provided another 3 inches. The last week we have received a decent amount of moisture, hopefully it isn’t too little too late.
Being unemployed I have not found myself with a lack of work. I have had some equipment through the shop and JPR Design Service LLC has acquired a couple of customers and hopefully will be able to realize some income soon. In the meantime we have decided to move. That is right, no more J.A.Root Farms produce for Hillsdale County. With family obligations we are working toward the goal of relocating back to the Monroe area. I will be concentrating on vintage IHC restoration and repair after this year’s harvest is complete. I enjoy it more and it pays much better than sweet corn and tomatoes on a small scale.
We are also looking forward to September and the 5th annual Mackinac Bridge Tractor Ride. I will be taking the 2-71 powered M on the ride this year. This is the only tractor I kept from the farm. It meant a great deal to my Father and thus to me. Earlier this year I rebuilt the engine but I’ve had some issues keeping a head gasket intact. I think I have corrected that. While going through the laundry list of items to repair before paint I have ended up neck deep in a rear end and transmission rebuild. That is another post though.
Until then, stop by for fresh sweet corn, some of the best you’ll ever eat. If it isn’t on the stand we’ll get you fresh from the field.
Mar
23
March 2012 has decided to take a turn for the warm, almost sweltering this past week. This is the first time I’ve ever been able to start seedlings directly in the greenhouse (unheated). Right now we have plants breaking ground daily. No fewer than 10 varieties of tomato, ranging from heirloom varieties to good disease and crack resistant hybrids and of course your delicious orange cherry tomatoes everyone seems to crave.
In a couple of weeks I will be starting cucurbits such as zucchini, cantaloupe, watermelon, cucumber and squash. We are going to quickly run out of room. Also for the second year in a row we are growing tobacco seedlings. Two varieties only this year. A Burley (KY16) and Virginia Bright Leaf. They have yet to sprout as they require a lot of heat and humidity (which has not been an issue this past week).
Last night I finally installed a sprinkler irrigation system with a timer inside of the greenhouse. I’ve gone with 6 cycles of 5 minutes @ 2 hour intervals and hopefully that doesn’t drown things. I guess we shall see tonight when I check on the little guys. Everything I purchased came from irrigation direct out of California. These are the same folks I purchased my drip irrigation from last year and I have been pleased with their products, shipping and customer service. Plus if you spend $100 shipping is free and it surely doesn’t take long to reach that $100 mark.
With this warm weather the ground has dried out quite well, probably too well. This allowed me to get the drip tape and plastic lifted from last year and I plowed everything under last week. The ground worked very nicely. Which has now added another “project” to my shop. I had an old IH #70 4-14 plow frame that my father robbed most of the parts from. I loaded it up and brought it home the other night. I am going to disassemble it to make it a 3 bottom and with new bottom parts that were originally purchased for the 412 I will put this #70 back together and probably scrap the 412. The pull type is more versatile for my needs as I can pull it with either the M (for recreational plow days) or the 560. With the 412 I am forced to use the 560 and since I have unloaded tires and no weights on it I’d need to cut it down to a 3 bottom. HP is never the issue, always traction. I will most likely steal the points, cylinder, coulters and frogs off of the 412 before it heads to be made into Chinese rebar. The frogs can always be used to convert an older pull type plow to Super Chief (servicable) bottoms.
Since the last entry in this blog I also reassembled the John Deere B that I have often cussed so much. No leaks were evident after refilling with 90 wt either. I finally got it started and it went home to Ida to await the June 16th auction. This freed up space to bring more work into the shop. After selling some wood working tools that collect dust I bought a good used 9 x 42 Bridgeport Chinese knock-off mill and have it in place, except for wiring it. This should diversify my shop capabilities and allow me to turn out more obsolete IH parts as I’ve slowly been doing. Mainly Farmall Super A / Super AV plow draft links, Farmall M & H fender spacers and Super A / 100 / 130 / 140 (and other) PTO block off plates for PTO delete tractors.
With this increased work we started a new business in January. JPR Design Services LLC is our new company and will be the marketing avenue for our products and some gardener / small farmer products and plans as well as design work, reverse engineering, 2D to 3D and possibly prototyping services for area businesses.
Finally, last night I was also able to adequately clean the paint and primer from the decal on the GM powered Farmall M. Enough so that I could read all lines. This is rather exciting because I believe, from initial research, that this company most likely did the installation of the 2-71 Detroit into this tractor. My next blog entry will be about this discovery and will include photographs. Hopefully someone out there will be able to assist me in piecing together the company history.
Feb
15
As with everything else, you must move forward and take advantage of new technology and methods. With the lengths that WordPress and theme creators have gone to it is now very easy to use WordPress as a Content Management System (CMS). Therefore I have decided to can the old static, difficult to modify, website created through Photoshop and turned into just images and simple HTML. In the coming weeks or months, as time permits, I will be transforming jarootfarms.com into a new website, hopefully more feature rich, user friendly and visually appealing. Until then I have moved the blog to the root directory and I will continue to update and post in it.
The following pages are poor photocopies of the original installation instructions for the GM diesel retrofit into a Farmall M. There is a lot of speculation, misinformation and mystery surrounding this GM offering. Hopefully this will help to clear up lingering questions and possibly aid others who wish to search for correct components to install one of these little 71’s into their own Farmall. Elsewhere I have instructions from GM for installing other 71’s tractors such as the Farmall F20 and the Case LA. When I happen to come across them I will digitize those also. If anyone has original instructions, paperwork and brochures I’d be interested in purchasing them.
There is a decal applied over the original paint on the left side of the fuel tank of my M. When the tractor was repainted part of the decal, mainly the edges, were sanded away as was some of the lettering and the whole thing painted over. I have been slowly working to remove the paint and primer so that I can read what is beneath. Right now I can make out the second and third lines which read; “The Farm Equipment Co” and “Detroit Grand Rapids”. I can slightly make out the last word of the top line but I am afraid that most of the top line has been sanded through enough substrate of the decal to remove the lettering. I need to investigate methods to see if I can highlight lettering as I really need to be able to read the top line to determine the company name. I am assuming this may be the company that originally sold OR installed the 2-71 into this Farmall.
You can open the images in another window to view them full size.


Houston we have a problem… This thing has too much compression and the stock M starter just doesn’t have enough go-nads. Result; she won’t spin over. That is what I’ve been fighting for the last week. A weak starting system.
Once I had the engine buttoned up I could easily spin her over by the fan and pistons, valves and cylinder head all cleared each other (thank God). I set the injectors to 1.460 and set valve lash, cold, at .013. I went through the manual procedure to determine how the engine was timed without taking it apart and the results say that the engine is timed “straight up” or standard. One more round on the torque wrench to make sure everything was tight (190 ft-lb isn’t a picnic on those cylinder head bolts) and we were ready to see if she’d run.
The engine turned over but slowly. Then the standard push button solenoid sparked, smoked, glowed and I can still smell the thing as it is lying on the shop floor. I thought, for sure, that the starter was shorted somewhere internally and was just drawing too much current. My load tester and multi meter both said the battery was good and fully charged and all of my battery cables measured nearly zero resistance. So I pulled the starter and disassembled it. The commutator has nothing left to turn off of it so the armature is toast. But I didn’t find any internal issues other than that.
To systematically eliminate issues I robbed a starter off of my other M, which I know is good and installed it. Still no joy. Replaced battery cables with larger ones. Still no Joy. Installed a standard automotive 4 post solenoid to remotely actuate teh starter with a remote button and finally I robbed the 2nd (new) 965 CCA battery from the 560 Diesel and put her into service on the M. Finally she spun over and to my surprise the little Detroit came to life. The little engine must have been full of fuel from turning it over continuously because it wet stacked and blew raw fuel all over the shop ceiling, the tractor, me and everything else in a 10 foot radius and filled the shop with smoke. I could have killed every mosquito for a half a mile if this had been Summer.
I let her run for a minute and then killed her. After that the battery was getting a little low and the starter rather hot and I never was able to spin it fast enough to get it to catch again. Time for a starter with more oomph. This though is turning out to be more challenging than I had anticipated. Short of some pricey starter put together to turn over big inch M pulling tractor engines there isn’t anything commercially available. Being the never satisfied engineer that I am…. I am now on a mission to “cobble” together a later, more powerful, starter from something like a 560 Diesel so that it will fit the M bell housing and ring gear. So we need to find a motor that will accept the 2 bolt nose cone and M bendix and spin CCW… That will be another “how to” post once I get it worked out and proven. I have a spare D350 starter from a Super WD9 that we’ll be experimenting with next week and a few other starters of various flavors to do the same with. So stay tuned for this continuing journey.
When I left off with the last post I had torn the little Detroit down and discovered 2 different liners installed in the engine. Both of these liners were of oval port style but the ports were different heights. One liner was an early small oval port (.703 tall) and the second was a  later small oval port (.810 tall) according to my inline 71 manual. Both pistons were of the non fire ring style and the rings, compression as well as oil control, were very worn. It is really no wonder this engine didn’t start very well. At some point this engine must have had an “oopsie” because the #2 rod is a replacement as well as the #2 injector rocker. The crank has also been turned .010 under on the rods at least (I did not pull a main). The rod bearings are fairly new and don’t exhibit any wear.
Since I am putting late long port (1.050) N liners in this engine I was concerned with air box to port shrouding. This engine block S/N is 2A18830 which would make it an earlier engine, somewhere around 1949 or 1950 without looking at a serial number chart. When measuring the air bo x opening I was surprised to discover that the casting measured just a touch over 1 inch in height the entire circumference on both holes. Both holes were round and consistent according to the bore gauge and both were stamped #1 on the deck. At this point I came into some luck was very fortunate to acquire two new standard OD tall port N liners and 18.7:1 fire ring pistons. These are factory Detroit Diesel and were still NIB packed in cosmoline and included the rings, wrist pins and pin retainers.
The counter bores in my block (a low block btw) measure right at .248 with my depth mic and my liner lips measure .250 so no shimming was required. After checking ring gap and side clearance I assembled everything and staggered per manual, oil the pistons & rings lightly and loaded them into the liners from the bottom. Everything slid easily into each bore as they should with only a bit of drag.
Once I had the rod caps on and torqued the situation became interesting. The pistons were above the liner @ TDC and were partially shrouding the bottom radius of the ports @ BDC. Investigation and question asking time. The low block is 1/16 inch lower than the high  blocks that the tall port N liners and pistons are meant for. In a low block the liner sits in the C-bore and proud of the deck. On a high block engine the C-bore is deeper and a spacer ring is used to set liner height. This was done to eliminate the requirement for a shim type head gasket used on the low block engines. High block engines used a compression ring and o-rings to seal the deck to head. According to the depth mic my pistons were .040 above the deck (.038 above liner). The head gasket when compressed is roughly 1/16 (.063). Thus, I have a quench distance of .025 inches (.063 – .038).
Apprehensive I moved forward and inspected the cylinder head and valves. Everything was nice a tidy in the head and someone had installed valve seats to recess the valves so they are no more than .006 above the gasket surface of the head. This is required to run N liners on a 2 valve head to avoid “contact” with the piston. Finally last night I put the cylinder head back on and broke out my big torque wrench. 190 ft – lb later and I was ready to spin the engine over BY HAND. Without injectors installed I could turn the engine over without difficulty by the fan and everything cleared in a cold state.
Tonight I should have it buttoned up, oiled and the fuel system bled and we’ll see if she will come to life.
Jan
27
In August 2004 my father, uncle and I attended a local auction where there was a Farmall M with a 2-71 Detroit Diesel conversion. My father was a Detroit Diesel “junky” and loved all things Detroit powered. Add a Detroit to an old tractor and he was in lust. The bidding that day ended at $4500 and he was on the losing end. But the story doesn’t end there.
 In 2007 my father received a phone call to tell him that the tractor he had bid on years before was for sale if he wanted to buy it. The winner of that auction had taken it home, gotten it running and parked it by the barn, moving on to different interests. Of course my father jumped at the opportunity. In July 2007 that M came home to J.C. Root & Sons.
For those not familiar with Detroit Diesel and the 2-71 retrofit kit of the 50’s here is some background. Detroit Diesel offered kits of various engines for various tractors. One of these kits was to retrofit a 2-71 into a Farmall M. When you purchased the kit you received the engine with appropriate bell housing and governor and other odds and ends. You re-used quite a few components and the instruction manual provided blue prints for certain brackets and a parts list for items you needed to secure to finish the job. In the last decade there have been a few ingenious individuals that have made their own adapter to put these little engines into an M. The difference here is that my M is an original kit installation and they are as rare as hen’s teeth. The glaring proof of this is that the bell housing has no separate adapter plate welded to it. The bell housing in this M is a one piece cast & machined item.
 At this point in time (late 2007) my father was more or less semi-retired so he and my uncle set out to get her running and everything cleaned up and redone on the tractor over the course of the next couple of years. My father added a factory IH wide front end and “borrowed” a pair of like new 14.9-38 Armstrong tires that I had taken off my M and put them on 560 rims and centers. The tractor received new gauges, steering wheel, seat and a reworking of the air, fuel and water plumbing on the engine. Bob Colbert Diesel in Detroit put new N70 injectors in her and gave the little 2 cylinder a tune up. They completed all of this in time for the 2009 Mackinac Bridge tractor ride. This was to by my father’s “last hay ride” more or less. By May 2010 cancer had claimed his life and my uncle the same not a year later in April 2011.
Fast forward to January 2012. The family has decided to sell the Root family farm and to hold an auction to dispose of 50 years worth of work and collecting by my father, uncle and grandfather. Of everything there this is the only thing I’ve decided to keep as it was my father’s “holy grail” and encompasses everything he was passionate about, Detroit Diesel engines and Farmall tractors. So in January 2012 I loaded her up and brought her home to J.A.Root Farms. Thank God for the Ramsey on the front of the trailer.
Backing up to November, I had started the little Detroit to take my nephew for a ride. When she lit off (she never has started well, requiring a good dose of either) she instantly went WOT and I had to shut the fuel off to her to shut her down. There is no emergency air shut-off at the blower and from sitting an injector had stuck WOT and in turn held the rack and 2nd injector in the same position. A rather terrifying few moments for someone who hasn’t experienced such a situation before.
 Once I got her home and into the shop I quickly discovered what I was sure to be true, a stuck injector. It doesn’t take much, just a bit of moisture. Easy enough to replace. But furthermore this engine has never started well so I figured I might as well rebuild it while I am at it and there is nothing else to do in the Winter. These little Detroits aren’t very complicated and I literally had her apart, on the bench in an hour and a half. What I discovered, upon cylinder head removal, was 2 different pistons and 2 different liners. Both N series but one old and one newer small port liner. Both will be replaced with new large port N series liners and pistons with a fire ring.
My goal for this tractor is to have it back together and running in the next week so that I can use it a bit this spring to make bad gaskets and seals leak. This way we an replace them and seal everything up prior to moving onto refinishing. I also have quite a bit of fabrication work to clean up and re-engineer. So stay tuned to the ongoing progress. With any luck this old girl will participate in the 2012 Mackinac Bridge tractor ride in September.